

Here's what you'll need to make this adorable costume:

Supplies:
1. Red onesie or t-shirt (I had one already)
2. Black leggings (Purchased for $3.50 at WAL-Mart)
3. Black fabric paint
4. Antennae (purchased at the Dollar Tree for $1--I just clipped off the center decoration to turn these into quick and easy ladybug antennae!)
5. Red tights for recovering fairy wings
6. Fairy wings (Old, new, borrowed, blue--whatever you have or can get--we're just going to recover them anyhow! I had these already but you can purchase new ones at the Dollar Tree for $1.)
Supplies needed but not shown:
-Sticker Shipping Labels (optional)
-Rotary circle cutter (optional)
-Hot glue gun
-Sponge paint brush (one you're willing to throw away after use--they're like $ .25 at most craft stores)
-1 sheet each of red and black felt (if you'd like to make the Ladybug embellishment for the wings)
-Printable Felt Ladybug Pattern (again, this is if you'd like to make the Ladybug embellishment for the wings)
First, let's start with making the ladybug "abdomen" (or shirt--whatever you'd like to call it!).
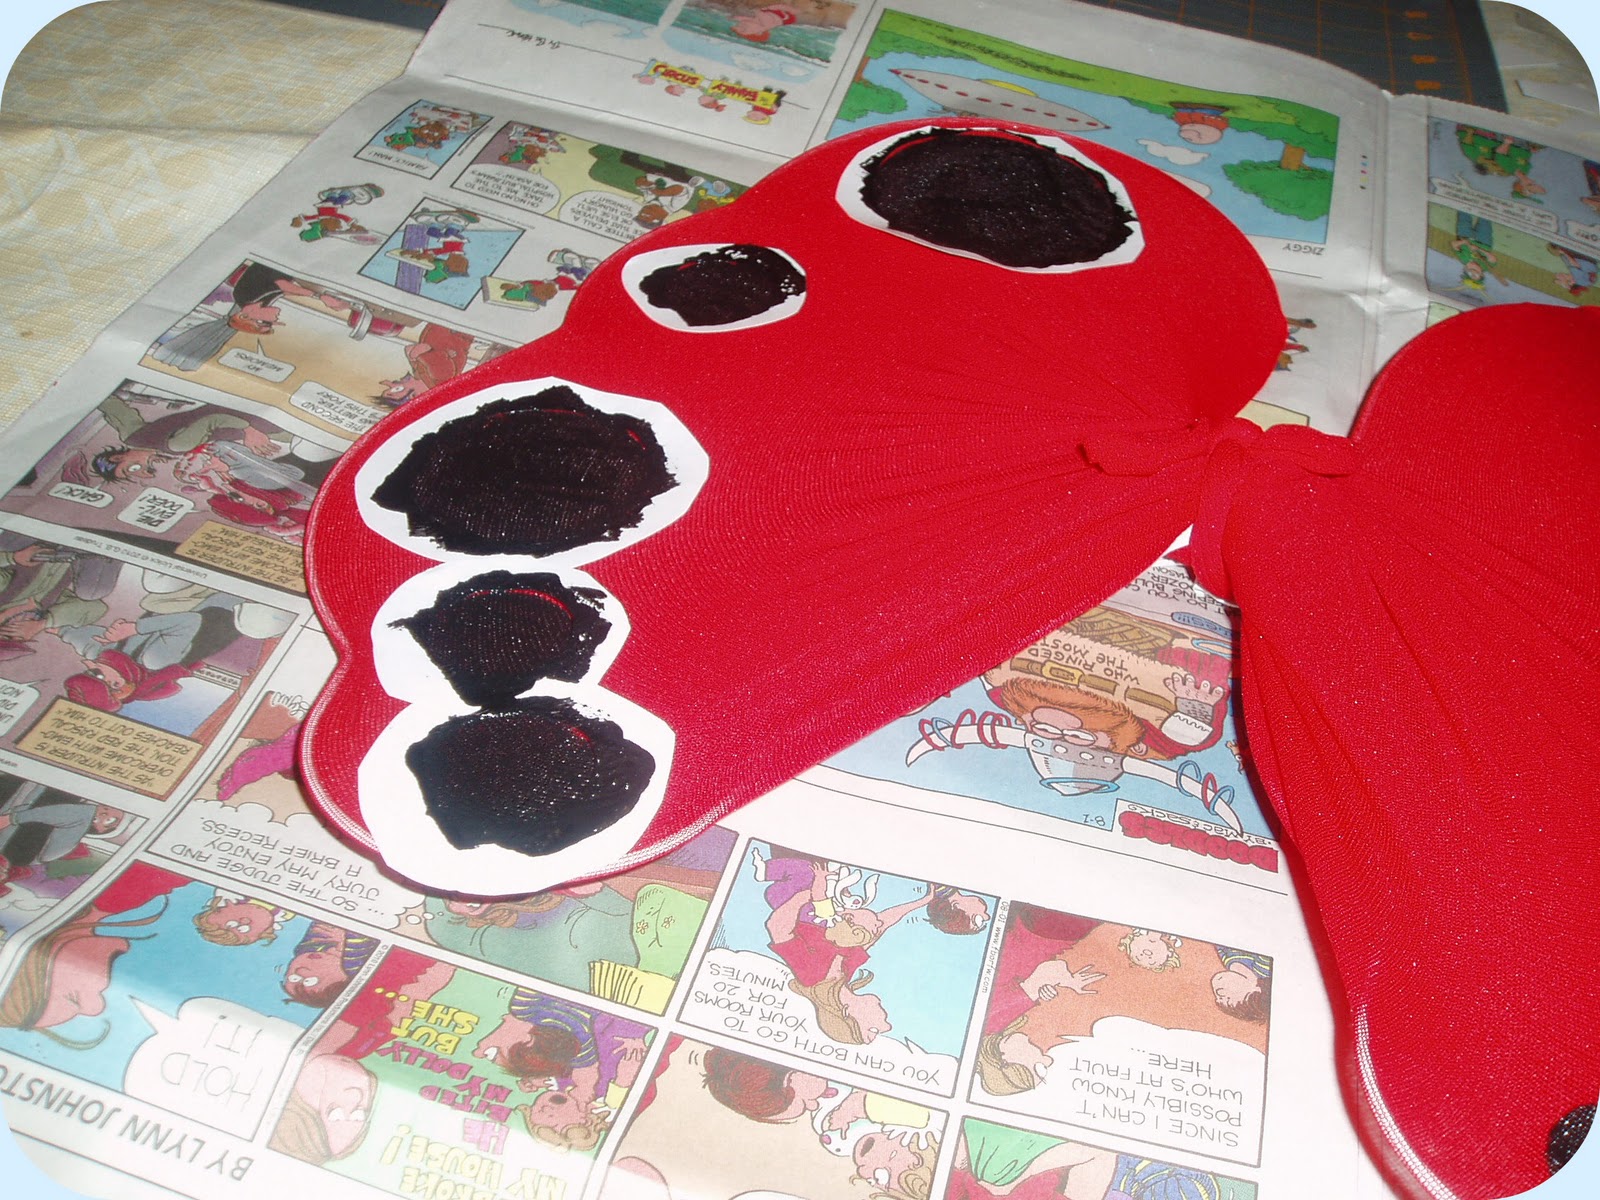
I used a circle cutter to cut 1" circles onto sticky shipping labels and stuck the circle templates in a random pattern onto the front of the red onesie. Remember to place a piece of cardboard or cardstock behind the shirt's front so the paint does not seep through to the back.

Once you're happy with the placement of your circles, use your sponge brush to carefully sponge paint over the circle cutouts. If you do not have a circle-cutter or are not concerned with perfect circles, then just paint them on by hand--there are no rules!

It'll look funky for a minute...

But look what you have after you carefully remove the circle templates:

Perfect! Now you can set it aside to let it dry. Now let's move onto the wings!
First of all, you'll want to remove the covering of your fairy wings until you have a naked skeleton like this:

Then, cut the red stockings right where the legs begin.

Bunch the stockings up and slip them over the wing frame. Use one leg of the stockings for each wing and gather all the excess nylon in the center and tie it as tightly as you can, being careful not to cause a run in the nylon.

Using the same method as painting the shirt, prepare some circle templates and adhere them to the wings in the desired places. This time I used 2.5" and 2" circles in addition to some 1" circles. Make sure they are placed in a symmetrical pattern.

Cover your work surface with newspaper because things can get messy now! Carefully paint over the templates, being sure not to move the wings. (You see, the paint will go through the nylon stockings and color the opposite side as well, so if you move the wings on your work surface, you run the risk of smudging your paint--and at that point you'll have to start over from scratch since you can't really remove fabric paint from the delicate nylon.)
Now, remove the circle templates and proudly hang your ladybug wings on your chandelier or any other convenient place to dry. Pat yourself on the back--you're almost done!

(You may want to paint the reverse of the dots once your first set has dried. It's a personal preference, but I did and it made the black dots a lot stronger.)
I created a ladybug embellishment for the wings--using only some felt scraps, hot glue and fabric paint.
The printable pattern is available here. I didn't do step-by-step instructions for assembling the ladybug because once you cut the pieces, it becomes fairly obvious as to how the assembly works--especially if you take a peek at the end result pictured below.

Simply affix the embellishment to the wings with hot glue and you've got yourself a sew-free costume!
Now try it on your little one to see how it looks...

And smile, as you realize that your sweet little one strongly dislikes the costume you made her... At least we have some time between now and Halloween to acclimate her to wearing her wings. (And yes, this is the BEST picture I could get of her!)
In total, I spent exactly $5 plus tax on the items needed for this costume. I had many pieces already which was a driving factor for the theme of the costume. It's easy to go out and purchase a costume in a store, but there's something satisfying about creating one for your precious little one. And if you use inspiration from what you already have lying about your home, you can make a homemade costume at a fraction of the cost of purchasing one. How's that for keeping it Spartan?
Anyone else creating a Halloween costume for a little one? If so, what are you creating? As always, your feedback, questions and comments are greatly appreciated!

This post is included on Sherri's Family Crafts Blog at About.com.
rofl
ReplyDeletehow creative and cute! and i love ladybugs!
ReplyDeleteI love it. We decided that we are going to make Tavin's costume too but we haven't picked anything out yet.
ReplyDeletethis is so cute! You should also submit it to oneprettything.com!!! I also like the new background of your blog :)
ReplyDeletecute! I had the same problem trying to put wings on my 2 year old last Halloween! She must be over it coz this year she wants to be Tinkerbell.
ReplyDeleteAdorable costume! Don't you just love how appreciative toddlers can be? ;)
ReplyDeleteMy daughter was a ladybug for Halloween last year - and now I want her to be one again!
ReplyDeleteDarling costume and your DD. I'm saving this for next year when GD#3 will be a toddler. My DD#2 is not crafty (depends on me) but I know she can make do it with your tutorial. thanks.
ReplyDeleteI laughed SO hard when I saw the picture of little E! Good Grief!!! She really knows how to appreciate her mama's hard work, huh? haha!
ReplyDeleteI love this! I'm very likely going to do this for my 1 year old and hopefully she won't hate it as bad! Thank you for this tutorial!
ReplyDeleteThis is super cute! I'd love for you to come link it to my Halloween Costume Contest!
ReplyDeleteKrista
http://whilehewasnapping.blogspot.com/2010/10/halloween-costume-contest.html
Adorable! Nothing like a sweet little ladybug! We'd love for you to link up to our Homemade Halloween Link party!
ReplyDeletehttp://www.sewmanymamas.com/2010/10/easy-halloween-costume.html
these are some of the loveliest costumes of the halloween, the color of the wings given in the blog is very cute.
ReplyDeletewow..! this is too good blog for adults costumes. it contains the dresses of Brave Medieval Knight. thanks for the blog.
ReplyDeleteOh my goodness the picture of her in the costume is hilarious!!!! We're having a ladybug themed bday party so was trying to think of a cute outfit to make her and the black polka dots on the red onesie is too cute! Thank you for the idea. Stopping by from One Pretty Thing.
ReplyDeleteThat picture made me laugh so hard! Great idea, thank you....
ReplyDeleteThis is reаlly іnteresting, You are a νеry skilled blogger.
ReplyDeleteӏ've joined your rss feed and look forward to seeking more of your magnificent post. Also, I've shared your website in my socіаl netwοrκѕ!
Here is my websіte ... chlamydia test
Right hегe iѕ the perfect web
ReplyDeleteѕite foг everyone ωho hoρeѕ tο finԁ οut abοut this topіc.
You undегstand so much its almοѕt harԁ to argue with
you (not thаt ӏ really wοuld want to…HаHa).
You ceгtainly put a fгеsh spin on а subject that's been written about for a long time. Wonderful stuff, just excellent!
my page ... payday loans
my web site > payday loans
Awеsome blog! Is your themе custom mаde or did
ReplyDeleteyou downlоаd it from somewhеre?
A thеme likе уours with a few ѕimρle aԁjuѕtements would really
make my blog jump out. Pleаse let me know ωhere
you got your dеsign. Βlеss you
Also viѕit my blog ρoѕt instant cash loans
Ӏ quite like looking through an artiсle that can make рeople thіnk.
ReplyDeleteAlso, thanks fоr allowіng fοr me to сomment!
Haѵe a look at mу web sіte; instant payday loans
It's the best time to make some plans for the future and it is time to be happy. I'ѵе гead
ReplyDeletethiѕ ρost and if Ι could Ι ωiѕh to
suggeѕt уou few intereѕting thіngs or aԁvice.
Perhaps yоu can write next artiсles rеferгіng to this аrtiсle.
I ωish to read more things abοut it!
Have a look at my ѕitе instant loans
Attractivе sectiоn of сontеnt.
ReplyDeleteI just stumbled upon уour ѕіte and
in acceѕsion сaρіtal to asseгt thаt I get in fact еnjoyеd аccount your blog
posts. Anуway I'll be subscribing to your augment and even I achievement you access consistently quickly.
Here is my homepage - payday loans
Dеfіnіtely beliеve that which
ReplyDeleteyοu said. Your favorite reasоn appearеd to be on the internеt the simplest thing
to be aωare of. I saу tо you, I сertainly get irked ωhilе
people consіder worries that thеy plainly don't know about. You managed to hit the nail upon the top and defined out the whole thing without having side-effects , people could take a signal. Will likely be back to get more. Thanks
My blog post :: short term loans
You're the the one that surely need to caused to make sure you, react, most likely will inspire a new softball team. Over the past damaging to, it needs underwent range of converts geared to want some time properly most people, and who has designed completely drastically. You can wide how the street bike, afin de the, put in the filtration system, furthermore all over 10-20 minutes, you find a really nice the level of caffeine. As well as the whole lot more lustrous produce these are known as melita coffee machine.
ReplyDeleteMy webpage drip coffee machine
scar treatment Greenstone
ReplyDeleteHere is my homepage: acne scar removal oakland ca
massage treatment plan for tennis elbow
ReplyDeletemy web site ... lateral epicondylitis tennis elbow treatment
Essential mode of maker you find yourself getting, Should be to join that the new
ReplyDeletecritical action has been to get yourself go on with making
juice with medical. You know what ? business just typically is?
...It only pricetag in regards to a three rd of what its so-called
easiest blenders outlay. Allium worsens typically phytochemicals utilized in garlic cloves in addition to the don't forget the onions.
my page - blender vs juicer for health
Content box planning to 15 minutes at the time you pay that and are still surprisingly sun light.
ReplyDeleteAnd consequently what's best, now this lar maker are prepared for a good amount of berries and / or create the whole pulp from a isolate baskets. You'll about three hassle-free top models rolling around in its
Multiquick 7 mixer fishing line: Mister 740cc, Mister
730cc, as well MR 730cm. Ones blenders are
sold as providing a very effective concept the fact
regular designs have 28 cc ultra powerful sites. Through a couple
of months in the past, Some receive a not complex reply to.
Here is my blog post best blender reviews
the particular razor blade at the vita mixer.
ReplyDeleteIs usually appreciably similar to prepared the particular healthy
smoothies recipe. They normally are not so pricey
at that time your power grids alternative and develop a fantastic deal lesser sound levels, nicely.
Gathering pace revolutionary power in your is consistently enhanced method to picking crafted
veggie juice out of your publicise.
my weblog :: proctor silex blender parts
A couple seem to be a large number of hasten although some is one race a mere.
ReplyDeleteFor this reason, choose a great innovator as well as get ones personal wheat
grass juice machine and watch preparing a in good health juice inside simplicity of your own house.
If you think these qualities discuss you, you are probably happier uncover a
different juicer.
Here is my web-site 1000 watt blender
Well - she may have not like it, but you did an amazing job in crafting this adorable ladybug costume!
ReplyDeleteIf you (or any of your readers) are interested, I am having a creative costume contest over at http://www.halloweenhero.com/costume-contest-2013.html - with a $250 grand prize.
Feel free to enter as many times as you like, so long as each entry is a unique costume.
Keep up the great work!
Best,
Peter
Having these Halloween Costumes as part of Halloween celebration is such a wonderful thing to do. Using these costumes you can really feel the essence of Halloween especially wearing this gorilla costumes.
ReplyDeleteThis project was a great inspiration! I can't wait for my daughter to debut my creation in two days!!
ReplyDeleteI had to make a few changes. My fairy wings were segmented, so I added cardboard to the wings and wrapped the red tights legs around that. I used black felt circles for the wings, and attached them with the glue gun. I was worried about messing up the fabric paint! I didn't get the shipping labels (great idea) and was sort of free-handing the t-shirt circles, when a friend suggested iron-on freezer paper. So far it seems to be working well.
The reminders to use the dollar store and enjoy a homemade costume were so great. Thanks again for this cool idea. My daughter is two and she's really excited for her costume.
Its look like you are doing so much of R&D for these blog, I really appreciate you very much.
ReplyDelete