Showing posts with label Junebug. Show all posts

9.29.2010

Homemade Toddler Costume - Fit for a Little Ladybug!

For all of us who aren't skilled seamstresses, the thought of a homemade Halloween costume can seem pretty daunting--but it certainly doesn't have to be.  With a few items I already had on hand and a few others I picked up at the dollar store, I was able to create a unique and adorable costume for my little Junebug.


Here's what you'll need to make this adorable costume:


Supplies: 
1. Red onesie or t-shirt (I had one already)
2. Black leggings (Purchased for $3.50 at WAL-Mart)
3. Black fabric paint
4. Antennae (purchased at the Dollar Tree for $1--I just clipped off the center decoration to turn these into quick and easy ladybug antennae!)
5. Red tights for recovering fairy wings
6. Fairy wings (Old, new, borrowed, blue--whatever you have or can get--we're just going to recover them anyhow!  I had these already but you can purchase new ones at the Dollar Tree for $1.)

Supplies needed but not shown:
-Sticker Shipping Labels (optional)
-Hot glue gun
-Sponge paint brush (one you're willing to throw away after use--they're like $ .25 at most craft stores)
-1 sheet each of red and black felt (if you'd like to make the Ladybug embellishment for the wings)
-Printable Felt Ladybug Pattern (again, this is if you'd like to make the Ladybug embellishment for the wings)

First, let's start with making the ladybug "abdomen" (or shirt--whatever you'd like to call it!). 
I used a circle cutter to cut 1" circles onto sticky shipping labels and stuck the circle templates in a random pattern onto the front of the red onesie.  Remember to place a piece of cardboard or cardstock behind the shirt's front so the paint does not seep through to the back.


Once you're happy with the placement of your circles, use your sponge brush to carefully sponge paint over the circle cutouts.  If you do not have a circle-cutter or are not concerned with perfect circles, then just paint them on by hand--there are no rules!


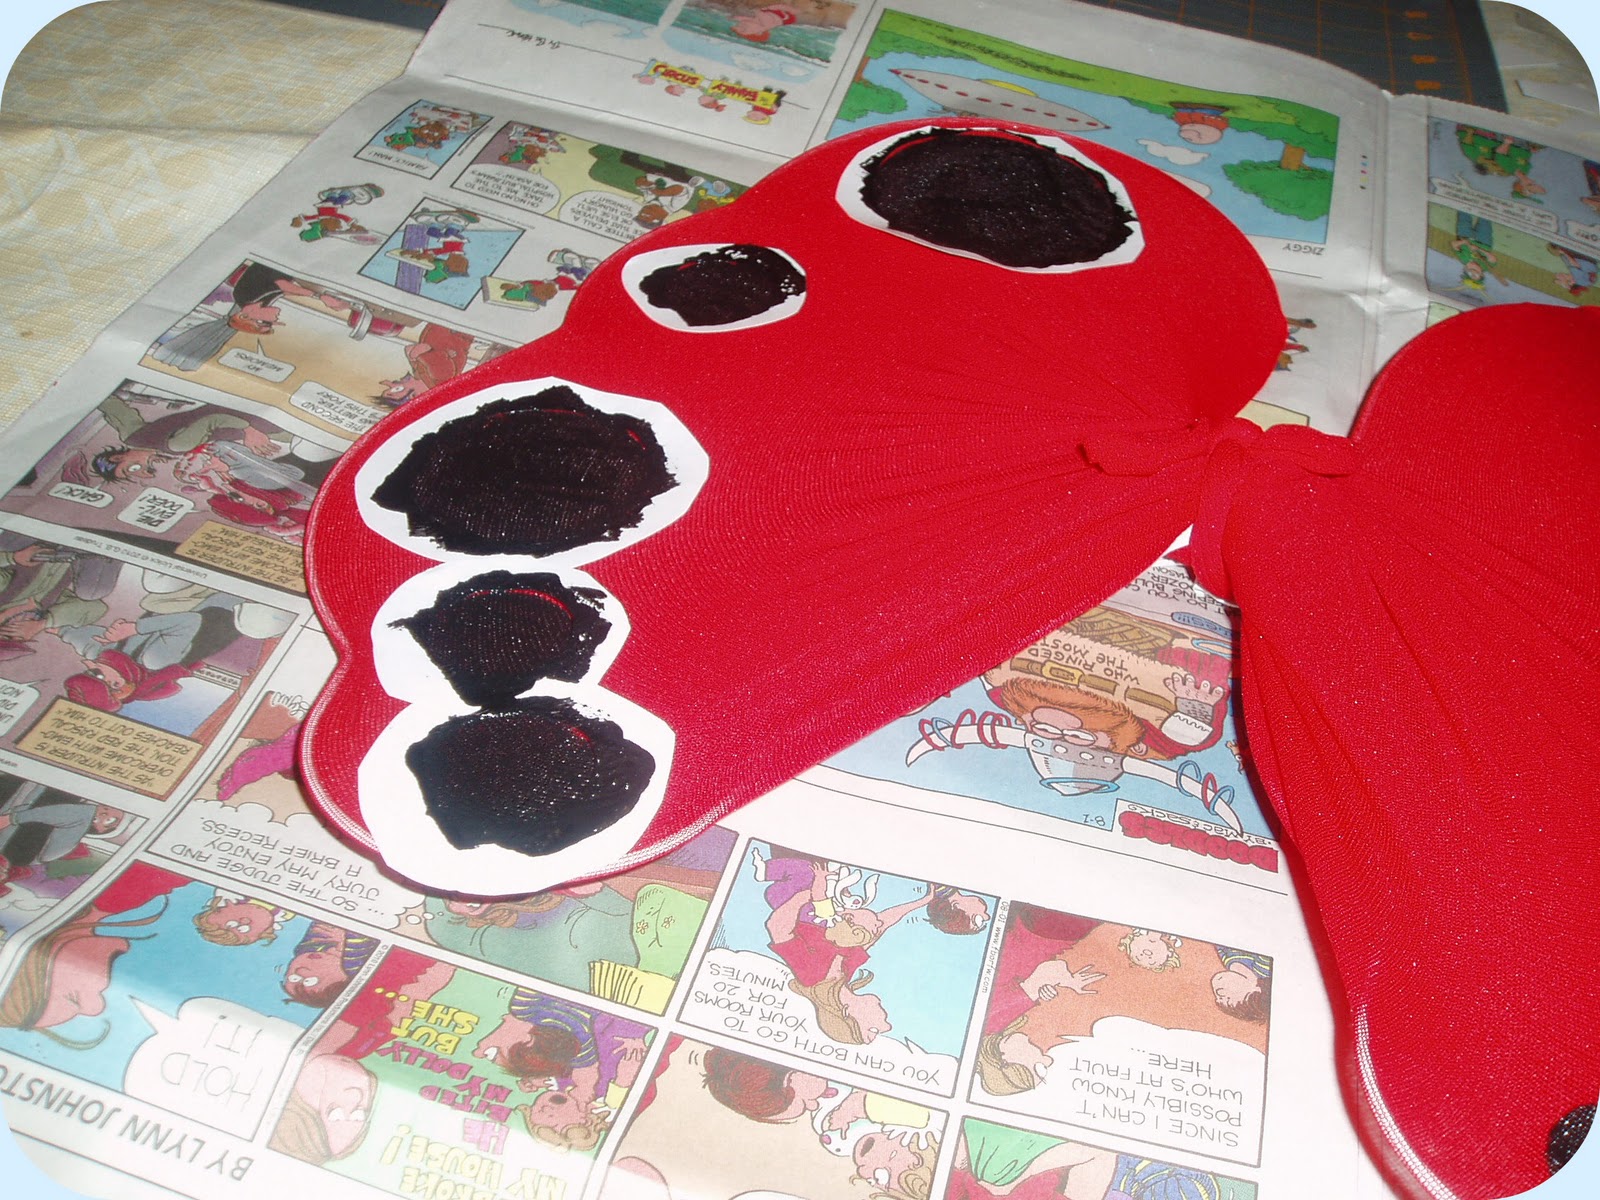
It'll look funky for a minute...


But look what you have after you carefully remove the circle templates:


Perfect!  Now you can set it aside to let it dry.  Now let's move onto the wings!
First of all, you'll want to remove the covering of your fairy wings until you have a naked skeleton like this:


Then, cut the red stockings right where the legs begin. 


Bunch the stockings up and slip them over the wing frame.  Use one leg of the stockings for each wing and gather all the excess nylon in the center and tie it as tightly as you can, being careful not to cause a run in the nylon.


Using the same method as painting the shirt, prepare some circle templates and adhere them to the wings in the desired places.  This time I used 2.5" and 2" circles in addition to some 1" circles.  Make sure they are placed in a symmetrical pattern. 


Cover your work surface with newspaper because things can get messy now!  Carefully paint over the templates, being sure not to move the wings.  (You see, the paint will go through the nylon stockings and color the opposite side as well, so if you move the wings on your work surface, you run the risk of smudging your paint--and at that point you'll have to start over from scratch since you can't really remove fabric paint from the delicate nylon.) 


Now, remove the circle templates and proudly hang your ladybug wings on your chandelier or any other convenient place to dry.  Pat yourself on the back--you're almost done!


(You may want to paint the reverse of the dots once your first set has dried.  It's a personal preference, but I did and it made the black dots a lot stronger.)

I created a ladybug embellishment for the wings--using only some felt scraps, hot glue and fabric paint.
The printable pattern is available here.  I didn't do step-by-step instructions for assembling the ladybug because once you cut the pieces, it becomes fairly obvious as to how the assembly works--especially if you take a peek at the end result pictured below.


Simply affix the embellishment to the wings with hot glue and you've got yourself a sew-free costume!
Now try it on your little one to see how it looks...


And smile, as you realize that your sweet little one strongly dislikes the costume you made her...  At least we have some time between now and Halloween to acclimate her to wearing her wings.  (And yes, this is the BEST picture I could get of her!)

In total, I spent exactly $5 plus tax on the items needed for this costume.  I had many pieces already which was a driving factor for the theme of the costume.  It's easy to go out and purchase a costume in a store, but there's something satisfying about creating one for your precious little one.  And if you use inspiration from what you already have lying about your home, you can make a homemade costume at a fraction of the cost of purchasing one.  How's that for keeping it Spartan?

Anyone else creating a Halloween costume for a little one?  If so, what are you creating?  As always, your feedback, questions and comments are greatly appreciated!


This post is included on Sherri's Family Crafts Blog at About.com.

8.13.2010

A "Shabby Chic" Nursery on a budget

Yesterday the Nester had a guest post about decorating a nursery.  I've never shared Elliott's nursery before and was inspired to do so today. 

Please excuse the untouched photos.  It would have taken me forever to edit each one and sheesh-I have a 14-month old and a busy life!  There are cords in the photos and little imperfections-so please overlook them!  Do you live in a perfect home with no cords and perfect lighting?  I didn't think so.  Let's be real, huh?

Let's skip the formalities--kick off your shoes and come on in and take a look!

Remember the mirrors?  I love them. 
The Jenny Lind crib and changing table were a Craigslist find--$35 for both pieces! 
I got all 4 baskets on the changing table for less than $12  at Jo-Ann Fabric.  Boo-yah!  I chose the brown and white crib bumper and skirt because I like the gender neutrality of it.  If ever we have another child and it's a boy, I'll add an apple-green fitted sheet in place of the pink one, stand back, smile, and move onto my next task!

The rocker was a curbside find.  James snatched it up and I had new foam cut and made slipcovers--all for under $40.


Elliott's dresser is my dresser from my childhood furniture.  I have the matching canopy bed waiting in the garage for when she moves out of the crib and into a big-girl bed.  Thanks Mom and Dad for buying me heirloom-quality furniture!


This lamp was one that James' grandfather had in his massive garage.  It belonged to a family member, and now it adds charm and elegance to Elliott's room.  I LOVE this lamp.


This lamp sits on Elliott's dresser.  James' mom made the lampshade with brown and pink ribbon and I found the pink base at Big Lots for $7.  Score!


This plate is actually a piece of Wedgwood China that I picked up at my favorite thrift store for 50 cents.  Doesn't it look like it was made to be hung on a wall?


From what I hear, this canvas was in my Uncle's nursery when he was a baby over 50 years ago.  It's called A Young Hare by Albrecht Durer.  This was actually in a humanities book of mine in college because Albrecht Durer was one of the first artists whose art was reproduced for the masses back in the 16th century.  This canvas is obviously a copy, but it's neat to have something in my daughter's nursery that my granny picked out for her child's nursery--and the fact that it's still around is pretty cool to me.  James hates it and says it's creepy and possessed.  I love it and say it's charming and timeless. 

I picked up these teacups at a local thrift shop for $1 each.  I bought the cups as one pink cup and two purple ones--and a few minutes after I got home from the thrift shop those two purple teacups were magically transformed into one cream and one brown cup with my trigger-finger and some spray paint.  I learned from the Thrifty Decor Chick that you can spray paint anything.  Even ceramics.  So I did it, too.  And it worked.

And what was Elliott doing while I took pictures of her room?  Wrecking it, of course.  I snapped this photo as she was looking over her mess and saying "uh-oh".  Classic.

7.29.2010

Mirrors, mirrors, on the wall...

Four or five years ago, I stumbled upon inspiration in a Pottery Barn catalogue.  Well, I constantly find inspiration in their catalogues--but that particular time, I actually followed through.  I clipped the page out of the book and set it aside for quite a while, and in the meantime, collected hand mirrors.  Yes, I collected hand mirrors, because you see, the Pottery Barn catalogue page showed dozens of hand mirrors mounted on to a wall and I fell in love with the idea.   I  bought some mirrors at thrift stores and antique shops here and there, never paying more than $3 or $4 for each mirror.  My mother-in-law and sister-in-law picked up several for me, too.  Fancy pretty ones.  Way nicer that the ones I bought.

After all that collecting, I didn't have the guts to put up hand mirrors anywhere on my walls.  It just seemed way too feminine to have in my bedroom or our living rooms.  So those beautiful mirrors sat aside and collected dust.  But that inspiration stayed in the back of my mind.

So when I found out I was having a baby girl, I knew exactly what to do with those mirrors.  Why, put them in my sweet Elliott's room, of course!  I shuffled the mirrors around on a large sheet of mailing paper until I found the arrangement I wanted, traced the mirrors and then taped the "template" to the wall.  My husband screwed holes where I had them marked according to the template.  I used small plate hangers to attach the mirrors to the wall. 

So with a few bucks and some inspiration, look what we accomplished:


Aren't they gorgeous?  And isn't she gorgeous?

7.15.2010

Cashew Chicken Lettuce Wraps

Last night for dinner we enjoyed Cashew Chicken Lettuce Wraps.  Below is my own adaptation of cashew chicken that I am sharing.  Typically I serve it over jasmine rice, however it's summer and I was looking for a lighter option--so iceberg lettuce wraps did the trick.


Chicken
1 lb. boneless skinless chicken thighs, chopped into 1" pieces
2 cloves garlic, minced
2 T soy sauce (I prefer Tamari)
2 T cornstarch

Vegetables
1 lb. carrots, sliced in half and chopped into 1" pieces
5-6 stalks celery, diced into 1" pieces
(If you like onion and bell pepper, add as much as you like!  My husband does not like either, so I omit--what a trooper I am!)

Sauce
1 cup chicken broth
2 T soy sauce
2 T cooking sherry
1/2 tsp. sesame oil
cornstarch slurry (2 T cornstarch with 2 T water blended in); set aside

Finishing Touch
1/2 cup cashews
Iceberg lettuce, leaves separated


1. In a wok or large skillet, heat 2 tablespoons vegetable oil and add chicken.  (You may need to cook chicken in batches to get it browned well.)  Stir-fry until cooked.  Remove chicken from wok and set aside.

2. Add additional oil to wok if necessary, and add vegetables, adjust burner heat if necessary. Cook for a few minutes until crisp-tender.  Add chicken and sauce.  (At this point I continued to cook the chicken and vegetables a bit longer in the sauce to soften them  since our little girl is now sharing in *some* of our table food.)  Add cornstarch slurry and cook over high heat until sauce is desired consistency, coating the chicken and vegetables well.  Give a taste and adjust to your preferences--add crushed red pepper for heat, extra soy sauce if you like, etc.  Rememer that unless you're baking, recipes are just guidelines!

3. Sprinkle cashews over top and serve with lettuce leaves for wrapping.  (This recipe serves 4 people)

4. Marvel as you eat that your little baby is sitting at the table and feeding herself.  Wasn't it this time last year that I was nursing her 8-12 times a day?  (Forgive my reminiscing; this week she's officially weaned.  Makes me realize how quickly she is growing...)


5.03.2010

Upcycled bluejean baby book!

Does anyone else have a stash of jeans you can't wear anymore?  I have had a stash for quite some time--I always wear my jeans out in exactly the same place--the buttocks.  Yep--it's true.  I get these little holes that start around the back pockets and then grow.  I am proud to say they they still would fit me, but I can't run around with holes around the back pockets.  Maybe some people think that's cool, but it is not a good look for me.  Ha.

So, what is a girl to do with these sad, unused, and abused jeans?  Upcycle them, of course!  I thought it may be neat to make a busy book for church, and found this fabulous example of exactly what I wanted to make.  Well, exactly what I wanted to make with some modifications, naturally.  I cut all of the "picture" pieces out of felt and other notions and hand stitched all of the pieces onto the denim.  Where I used a template, I included a link below for your reference.

Here is our new quiet church book:

The cover--"E" is for Elliott, of course.


The flower stem is green ric-rac and the pieces are all made from felt.  I also added interesting textures by using buttons for the owls' eyes and a button for the center of the flower.  I love those owls.  You can get the owl template here.


These two are my favorites.  I am planning a watermelon themed first birthday party for Elliott and so watermelons are on the brain!  The seeds are teeny black seed beads, and the rind is again, green ric-rac.  The westie outline is from SewAmazin with my own little embroidery to make it more like our westie, Brian.


This flower is made of ribbon on a shiny background with, again, buttons and green ric-rac.  I am so in love with this little hedgehog!  You can get the template at Megity's Handmade.  His little nose and eye are black seed beads.  Oh he's precious!

I showed this book to Elliott and in true baby fashion, she took a good look at each page and then threw it across the room.  Sheesh.

5.01.2010

Sewing on Saturday

Today I made a dress for Elliott out of napkins. For real--napkins--and some old ribbon I had in my gift wrap drawer.  Today she wore those napkins proudly like the classy little lady she is!  Here's the finished product:


I traced a dress Elliott currently wears and adjusted the measurements a bit to create the shape and winged it from there.  (I am happy to report that the whole process, start to finish, took about 45 minutes.  A great nap time project!)  I may eventually make a tutorial for those of you who have extra napkins lying about. Yay!


A few weeks ago, Jessica from Sew Homegrown shared how she uses spools to organize her daughter's pony tail holders.  Brilliant, right?  I made a barrette organizer for Elliott's hair clips a while back, and am now re-thinking the design--in an effort to include mounted spools for pony tail holder organization.  Here's what I made:

It's simply an old frame (that I spray painted) with the glass removed and the insert is wrapped in fabric and quilt batting.  I added some thick ribbons running vertically before securing the frame's insert, and I won't lie--the vertical ribbons are affixed with duct tape (a girl's best friend).  This was a very simple, cheap and quick project and it really has kept us organized. 

By using a flatter and wider frame, you could attach spools along the bottom of the frame (or anywhere, really) and utilize both organizing techniques in one.  Maybe I'll get motivated to do that soon!

Any other clip/barrette/pony tail holder organization tips/ideas/suggestions?

4.22.2010

Earth Day

Happy Earth Day!  I thought I'd share a few ways I have "gone green" recently...

We revamped our landscaping and replaced all harvested mulch with rubber mulch.  It's basically old tires that have been shredded and colored.  It means that we no longer have to kill trees by re-mulching annually and we have saved many tires from filling up landfills. 

In specific celebration of earth day, I planted some aloe shoots from my aloe plant today.   It's my first time "multiplying" my plant, so we'll see how it goes.


I have been doing a few felt crafts lately, too, inspired by The Purl Bee and the felt that I use is made of 100% recycled plastic bottles.  Neat, huh?  Here is what I have so far:

Rose Barrettes


and Felt Aquarium Magnets


In addition, we are saving energy and water with our new LG HE front loader set.  Our old washer used 40-50 gallons per load of laundry, and this one uses 18 or less and a fraction of the detergent.  The dryer dried a full load of laundry in 21 minutes--my old dryer would have taken over an hour for the same sized load.  I am loving these new appliances!


And on a side note, how do you keep a 10 month old busy for a few minutes?  Let her watch the front loaders--now that's good "clean" fun!

We are really trying to make an effort to "be green" without buying into the trendy and marketed aspects of the movement.  I am experimenting with making my own cleaners (more on that later) and we're composting and trying to reduce our waste in general.  Going green also saves "green" (as in cold hard cash)--so get out there and hug a tree!

1.30.2010

Back to Blogging-for real this time!

It's amazing that my last post was June 4, 2008 and at that time I was promising that I was back to blogging. What a farce! It is my intention to really get back to blogging now-oh, how I love and have missed blogging!

To catch you up, on June 12, 2009 (one year and a few days past my previous post) I gave birth to our daughter, Elliott June Wright. She was 7 lbs. 7oz. and 19 1/4".


I have learned so many things in the past 7 months of having a child. The biggest lesson of all? Time flies.

Here's to making the most of it.


Related Posts Plugin for WordPress, Blogger...